Kubernetes, Local to Production with Django: 5— Deploy to AWS using Kops with RDS Postgres

So far we have covered:
- Part 2: How to deploy a basic Django application into a local Kubernetes cluster.
- Part 3: Integrated with a Postgres database and run migrations.
- Part 4: Added Celery for asynchronous task processing with Redis as a message broker as well as a cache backend.
Objectives
Finally it’s time to deploy the application to the cloud. The focus is on AWS due to it’s large market share. To this end, the following points are covered:
- Configure AWS RDS to be an external Postgres data store.
- Update the manifest files to utilize the AWS RDS postgres database as well as leverage cloud specific services.
- Utilize the Kubernetes Operations (kops) tool to manage production-grade, high availability Kubernetes clusters from the command line.
- Add basic monitoring to the deployed Kubernetes clusters.
Requirements
There are several requirements necessary in order to follow this tutorial.
- Basic background knowledge about Kubernetes and AWS is assumed.
- An active AWS account with AWS API credentials where the minimal permissions are:
AmazonEC2FullAccess
AmazonRoute53FullAccess
AmazonS3FullAccess
IAMFullAccess
AmazonVPCFullAccess- The AWS CLI has been installed and configured with the right credentials.
- Domain name and hosted DNS zone in AWS Route 53. The domain name is used by kops to create the subdomains for internal routing.
In addition, the code for this part of the tutorial series can be found in Github in the part_5-deploy-to-aws-with-kops branch. Once the github repository has been cloned, the Kubernetes manifest files can be found in kubernetes_django/deploy/.. and is assumed to be the current working directory when applying the Kubernetes manifest files.
2. Postgres
So far, the Postgres database has been another pod in the cluster, where storage has been managed using the PersistentVolume subsystem. However in production, it’s better to use a database as a service offering such as AWS RDS. Such services provide features that can be hard to implement and manage well, which include:
- Managed high availability and redundancy.
- Ease of scaling up or down (i.e. vertical scaling) by increasing or decreasing the computational resource for the database instance to handle variable load.
- Ease of scaling in and out (i.e. horizontal scaling) by creating replicated instances to handle high read traffic.
- Automated snapshots and backups with the ability to easily roll back a database.
- Performing security patches, database monitoring etc.
Security Group Configuration
Before creating the Postgres database, we need to ensure it can be externally accessed. This requires the implementation of AWS security groups. These are virtual firewalls that control the traffic to and from instances. For the sake of simplicity, we will be giving open permissions to the security group. Note that this is highly insecure and should not be done in production. To create the security group, we first need to create environmental variables that will be reused:
$ export AWS_REGION=us-east-1
$ export SECURITY_GROUP_NAME=kubernetes_django_insecure
The security group can be created by running the following command:
$ aws ec2 create-security-group \
--description ${SECURITY_GROUP_NAME} \
--group-name ${SECURITY_GROUP_NAME} \
--region ${AWS_REGION}
This should give a similar output:
{
"GroupId": "sg-3878d54f"
}
The GroupId variable will be used when creating the database instance, It’s then stored as an environmental variable for reuse. Utilizing the above GroupId as an example, the command is:
$ export SECURITY_GROUP_ID=sg-3878d54fWe need to add the appropriate permissions to the security group, this is done by running:
$ aws ec2 authorize-security-group-ingress \
--group-id ${SECURITY_GROUP_ID} \
--protocol tcp \
--port 5432 \
--cidr 0.0.0.0/0 \
--region ${AWS_REGION}
Creating the database
In order to use an external Postgres database in the Kubernetes cluster, it needs to be created in AWS RDS. First we need to create environmental variables that can be reused:
$ export AWS_REGION=us-east-1
$ export RDS_DATABASE_NAME=kubernetes-django
$ export RDS_TEMP_CREDENTIALS=kubernetes_django
The database can then be created by running the following command:
$ aws rds create-db-instance \
--db-instance-identifier ${RDS_DATABASE_NAME} \
--db-name ${RDS_TEMP_CREDENTIALS} \
--vpc-security-group-ids ${SECURITY_GROUP_ID} \
--allocated-storage 20 \
--db-instance-class db.t2.small \
--engine postgres \
--master-username ${RDS_TEMP_CREDENTIALS} \
--master-user-password ${RDS_TEMP_CREDENTIALS} \
--region ${AWS_REGION}
Note:
- This might take a few minutes for the database creation to complete.
- Do not forget to delete the database when you are done with the tutorial otherwise significant cost will be incurred
Once created, the command to get the RDS endpoint is:
$ aws rds describe-db-instances \
--db-instance-identifier ${RDS_DATABASE_NAME} \
--region ${AWS_REGION}
Keep trying to run the above command if you don’t see a similar result to the following embedded in the output:
$ {...
"Endpoint": {
  "Address": "kubernetes-django-rds-sample.<hash>.us-east-1.rds.amazonaws.com",
  "Port": 5432,
  "HostedZoneId": "Z2R2ITUGPM61AM"
}
...}
The Endpoint variable will be used in the Kubernetes service
Updating the manifest files
Using Amazon RDS Postgres will require some changes to the existing manifest files which include:
- Not utilizing the
PersistentVolumesubsystem as well as not having a Postgres deployment controller. - Create a service definition to use the AWS RDS endpoint, which means any configuration that is dependent on the postgres database will remain the same. Such behaviour is desirable in loosely coupled systems.
- Create a Secret manifest file using the new credentials
We will be using the Endpoint value from the describe-db-instances command we ran earlier. The configuration file for the RDS service becomes (in the file ./deploy/kubernetes/rds/service.yaml from the repo):
The difference when using an external service vs an internal service is:
- The
spec: selectorfield is not specified as it doesn’t apply to a specific pod. - The
spec: externalNamehas the value of the Endpoint address. - The
spec: portsfield is not defined.
Next we need to have a mechanism to pass the username and password into the Kubernetes cluster, this can be done by creating the ./rds/secrets.yaml file with the following configuration:
The username and password is a base64 encoded string generated by executing:
$ echo -n ${RDS_TEMP_CREDENTIALS} | base64This is not a secure setup as the file can be stored in source control. A more secure option might be to create the secret resource imperatively using the kubectl create secret shell command.
3. Django
Updating The Django Service
So far we have been using the NodePort type for all the services that require public access. Even though it works for the minikube environment, such a configuration fails to take advantage of cloud specific compute primitives such as external load balancers when deployed. To use the Load Balancers provided by AWS, the type needs to be set to LoadBalancer, which means the updated django service configuration becomes (in ./deploy/kubernetes/django/service.yaml):
It might be tempting to change all the public facing services from a NodePort to a LoadBalancer type. However, most managed Load Balancers incur a cost including the AWS Elastic Load Balancer. It’s prudent to only use the LoadBalancer service type when necessary. In some cases it’s cheaper to use the NodePort type, with port forwarding enabled for services that needs to be viewed from the browser, but don’t necessarily needs to be accessed by the general public e.g. monitoring services. We will see this later when using celery flower.
4. Kops
Now that we have updated the manifest files it’s time to deploy the application to AWS. Deploying a Kubernetes cluster from scratch is quite challenging as it involves a lot of moving parts, which includes and not limited to (from Kubernetes the hard way):
- Provisioning the compute instance as well as the CA and generating TLS certificates.
- Bootstraping the etcd Cluster, the Kubernetes Control Plane and Worker Nodes.
- Provisioning Pod Network Routes etc.
To this end, there are several ways to use Kubernetes as a cluster in the cloud, which include:
- Using a platform that has managed Kubernetes such as Google Kubernetes Engine, Azure Container Service, Openshift, Giant Swarm etc. (see docs for more solutions).
- Use tools that can do the managing for you e.g. kops
For this tutorial we will be using the kops tool to manage the cluster on AWS.
What is kops?
Kops is an official Kubernetes project for managing highly available production-grade clusters from the command line i.e. it can be thought of as kubectl for clusters. It’s currently the best tool to deploy Kubernetes to AWS.
Installing kops
Kops can be installed by running:
$ brew update && brew install kopsStoring kops state
The state of the cluster to be deployed is stored in a dedicated s3 bucket, which will become the source of truth for the cluster configuration. First the bucket name is set as a shell variable to allow for reuse.
$ export BUCKET_NAME=kubernetes-django-kops-exampleThe command to create the s3 bucket to store the cluster state is:
$ aws s3api create-bucket \
--bucket ${BUCKET_NAME} \
--region ${AWS_REGION}
Next, kops needs to be aware of the the bucket name, this is done by updating the KOPS_STATE_STORE variable to point to the bucket name:
$ export KOPS_STATE_STORE=s3://${BUCKET_NAME}Route53 Domain
Kops is an opinionated provisioning system which uses a valid DNS name as the cluster name, as well as for discovery inside the cluster in order to reach the Kubernetes API service. There are several advantages for doing this which include; unambiguously sharing the clusters, and not having to remember the IP address. It is advised the DNS name should be a subdomain (for example the one I used when testing was kubernetes-django-cluster.cloudbayes.com). Creating the Route53 DNS is beyond the scope of this tutorial but several documentation exists on how to do this. The DNS name is stored as an environmental variable for reuse:
$ export ROUTE53_KOPS_DNS=<subdomain>.<domain>.comCreate Cluster
The cluster can then be created as follows (can take up to 15 minutes):
$ kops create cluster \
--name ${ROUTE53_KOPS_DNS} \
--ssh-public-key=~/.ssh/<ssh_key>.pub \
--zones us-east-1a,us-east-1b,us-east-1c \
--state ${KOPS_STATE_STORE} \
--node-size t2.small \
--master-size t2.small \
--node-count 2 \
--yes
Let’s explore the different arguments:
kops create clusteris the command necessary to create cloud based resources which include vpc, subnets, compute instances etc.--name ${ROUTE53_KOPS_DNS}argument defines the name of our cluster it has to be the domain that was created in Route53 e.g.<subdomain>.<example>.com.—-ssh-public-key=~/.ssh/<ssh_key>.pubis an optional field and if not provided defaults to~/.ssh/id_rsa.pub. It’s used to allow ssh access to the compute instances (I prefer to be explicit about what ssh key to use).—-zonesdefines which zone to run the cluster in. I prefer to use different zones for redundancy, as opposed to have the cluster only reside in one zone.—-node-sizeand—-master-sizeindicates what compute instance types should be created, if not provided defaults tom2.medium.--node-countindicates the number of compute instances to be created, if not provided defaults to 2.—-stateis the location of the state storage which should be the s3 bucket.--yesmeans that the cluster should be created immediately, if not provided it will only show a preview of what steps will be executed.
Kops provides more arguments to allow for the fine tuning of the cluster, this can be investigated by reading the kops documentation. Once the cluster is created, we can confirm the context that kubectl will be using when performing actions to the cluster, this can be done by:
$ kubectl config current-contextkubernetes-django-cluster.cloudbayes.com
Where the output should be the DNS name that was given to the cluster. In order to confirm that the cluster was created, the following command can be used (it can take a few minutes to complete):
$ kubectl get nodesNAME                           STATUS    ROLES     AGE      VERSIONip-172-20-35-16.ec2.internal    Ready     node      10h       v1.8.6
ip-172-20-36-29.ec2.internal    Ready     node      10h       v1.8.6
ip-172-20-58-114.ec2.internal   Ready     master    10h       v1.8.6
This indicates that 3 compute instances were created which contains 1 master and 2 nodes all running Kubernetes version 1.8.6.
5. Deploy to the Cluster
In order to deploy the application to the cluster, run the following commands (from the kubernetes_django/deploy/.. folder in the repo):
$ kubectl apply -f rds/
$ kubectl apply -f redis/
$ kubectl apply -f django/
$ kubectl apply -f celery/
$ kubectl apply -f flower/
We have covered what each of the files do in previous tutorials. The only difference is that we are not deploying the manifests files found in the postgres/ folder which were configured to use the PersistentVolume subsystem. Instead we will be deploying the manifests files in the rds\ folder which has been configured to use RDS Postgres.
Kubernetes Dashboard
To get a similar dashboard that is used by minikube, we need to use the kubernetes-dashboard tool. This is a general purpose, web-based UI for the Kubernetes cluster. To deploy the dashboard, execute the following command:
$ kubectl apply -f https://raw.githubusercontent.com/kubernetes/dashboard/master/src/deploy/recommended/kubernetes-dashboard.yamlTo expose the dashboard in a browser from the local workstation, we need to create a secure channel to the Kubernetes cluster, this can be done through:
$ kubectl proxyThe dashboard can now be accessed from:
http://localhost:8001/api/v1/namespaces/kube-system/services/https:kubernetes-dashboard:/proxy/
View the Django application
Once the Dashboard is running and can be accessed from the browser. We need to retrieve the Load balancer endpoint. This can be done by clicking the services link in the sidebar which should display:
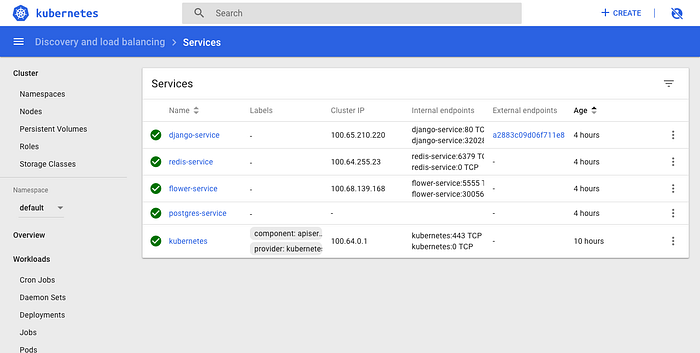
Along the row with the django-service (the first row in the above image), in the External endpoints column, the Load balancer endpoint is shown which can be clicked to see the running application i.e. from above it starts with a2883c09.... The following result should be shown when clicking the Load balancer endpoint:
Note: It can take a few minutes for the health checks to pass so you might not see the django application immediately, give it a few minutes if nothing is initially displayed on the endpoint.
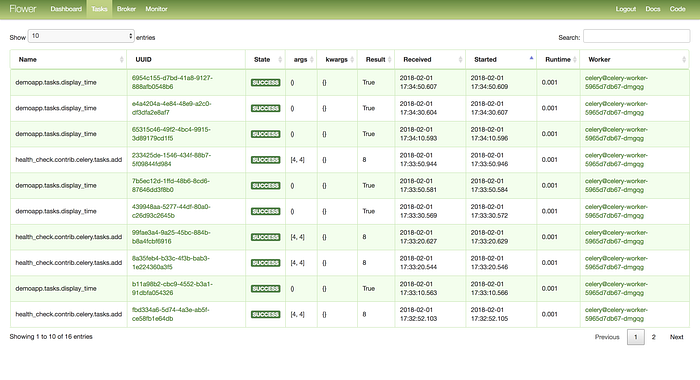
Celery Flower
The celery flower monitoring tool can also be viewed on the browser. To do this we need to create another secure channel to the Kubernetes cluster. In a separate terminal tab, run the following command:
$ kubectl port-forward <flower-pod-name> 5555:5555Where the pod name can be gotten from the kubernetes dashboard (or by running kubectl get pods). On navigating to http://127.0.0.1:5555/, the following result should be shown:
6. Cleaning Up
The AWS cluster resources costs money, which means once we are done, we need to clean up what was created.
To delete the cluster, which removes all the AWS resources that were created by the kops create command, run:
$ kops delete cluster \
--state ${KOPS_STATE_STORE} \
--name ${ROUTE53_KOPS_DNS} \
--yes
In addition, the rds instance that was created needs to be deleted by running:
$ aws rds delete-db-instance \
--skip-final-snapshot \
--db-instance-identifier ${RDS_DATABASE_NAME} \
--region ${AWS_REGION}
And deleting the security group:
$ aws ec2 delete-security-group \
--group-id ${SECURITY_GROUP_ID} \
--region ${AWS_REGION}
Finally deleting the s3 bucket that’s been used as the state store:
$ aws s3api delete-bucket \
--bucket ${BUCKET_NAME} \
--region ${AWS_REGION}
7. Conclusion
We finally have deployed a running Kubernetes cluster to the cloud and we are getting closer to a production worthy application. However, we have not covered some important aspects such as managing security and automation which is beyond the scope of this tutorial.
The next tutorial will focus on implementing more advanced monitoring and logging capabilities to the cluster.
If you like this post, don’t forget to like and/or recommend it. You can find me on Twitter as @MarkGituma.
8. Credit
- https://medium.com/cloud-academy-inc/setup-kubernetes-on-aws-using-kops-877f02d12fc1
- https://kubecloud.io/setting-up-a-highly-available-kubernetes-cluster-with-private-networking-on-aws-using-kops-65f7a94782ef
- https://github.com/kubernetes/kops/blob/master/docs/aws.md